
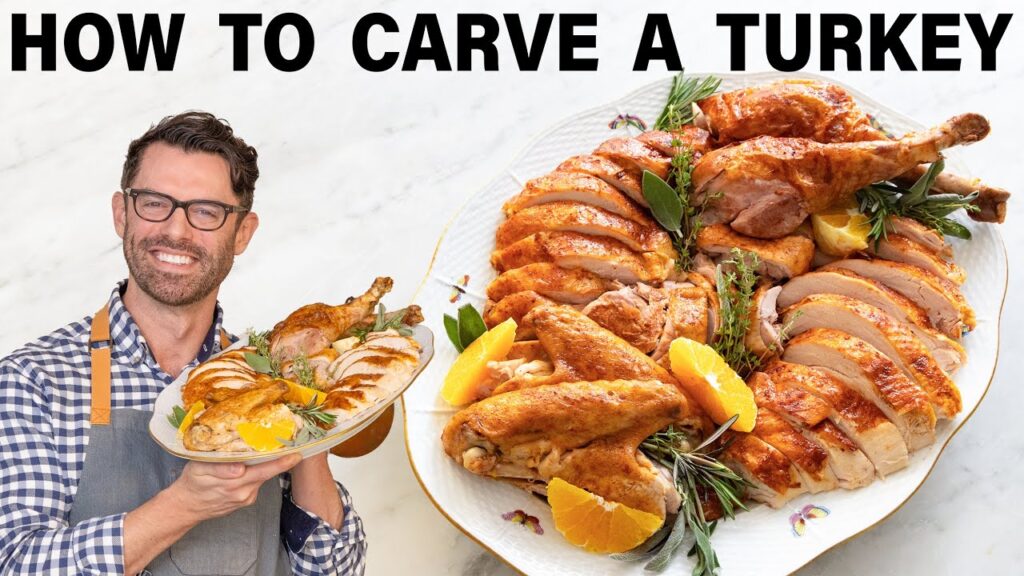
The best way to carve a turkey starts with proper preparation, sharp tools, and knowing the right technique.
Whether you’re hosting Thanksgiving for the first time or you’re a seasoned cook, mastering turkey carving transforms your holiday presentation from chaotic to professional.
Table of Contents
Why Proper Turkey Carving Matters
Carving isn’t just about cutting meat into pieces. The technique you use directly affects how your turkey tastes and looks.
Poor carving tears the meat fibers. This releases all those precious juices onto your cutting board instead of keeping them in the meat.
Good carving preserves moisture and texture. Each slice should be tender, juicy, and visually appealing on the plate.
Your guests notice the difference immediately. Professional-looking slices elevate the entire dining experience and show respect for the meal you’ve prepared.
Essential Tools for Turkey Carving
Sharp Carving Knife
A sharp knife is your most critical tool. Dull knives tear meat, create ragged edges, and require excessive force.
The ideal carving knife has a blade between 8-12 inches long. This length allows smooth, single-stroke cuts through large breast sections.
Look for a straight-edge blade rather than serrated. Serrated edges can shred delicate turkey meat and pull away the crispy skin.
High-carbon stainless steel holds an edge longer. It combines the sharpness of carbon steel with rust resistance.
Carving Fork
A sturdy carving fork keeps the turkey stable while you work. This two-pronged tool prevents the bird from sliding around.
Long, sharp tines grip the meat securely. They should penetrate easily without requiring excessive force.
The fork handle should match your knife for balanced control. Some sets come perfectly paired for comfortable use.
Cutting Board
Choose a large cutting board with a juice groove. The groove catches drippings and prevents messy spills on your counter.
Wood or bamboo boards work exceptionally well. They’re gentle on knife edges and naturally antimicrobial.
Make sure the board is stable and won’t slide. Place a damp towel underneath if needed for extra grip.
Additional Helpful Items
Kitchen shears help cut through stubborn joints. They’re particularly useful for separating the drumstick from the thigh.
Paper towels keep your hands clean and dry. Wet, greasy hands lose grip and create safety hazards.
A large serving platter should be ready nearby. You can transfer carved pieces immediately, keeping them warm.
Aluminum foil covers the platter and retains heat. Turkey cools quickly once carved, so covering helps maintain temperature.
Preparing Your Turkey for Carving
Let the Turkey Rest
Never carve immediately after removing the turkey from the oven. The bird needs 20-30 minutes of resting time minimum.
Larger turkeys (over 15 pounds) benefit from 30-45 minutes of rest. This settling period allows juices to redistribute throughout the meat.
During resting, the internal temperature continues rising. It typically increases by 5-10 degrees Fahrenheit as heat migrates from exterior to interior.
Cover the turkey loosely with foil while it rests. This keeps it warm without trapping steam that could soften the crispy skin.
Remove Trussing Materials
Cut away any butcher’s twine holding the legs together. These strings served their purpose during cooking but now just get in your way.
Use kitchen shears or your knife tip to snip the twine. Be careful not to tear the skin in the process.
Discard all trussing materials before beginning. You don’t want to accidentally serve string alongside your beautiful turkey slices.
Set Up Your Carving Station
Position your cutting board on a stable, comfortable work surface. Make sure you have enough elbow room to maneuver.
Arrange all tools within easy reach. Your knife, fork, shears, and paper towels should be immediately accessible.
Place the serving platter next to your workspace. This minimizes the distance for transferring carved meat.
Ensure good lighting over your work area. You need to see joint locations and cutting lines clearly.
Step-by-Step Turkey Carving Guide
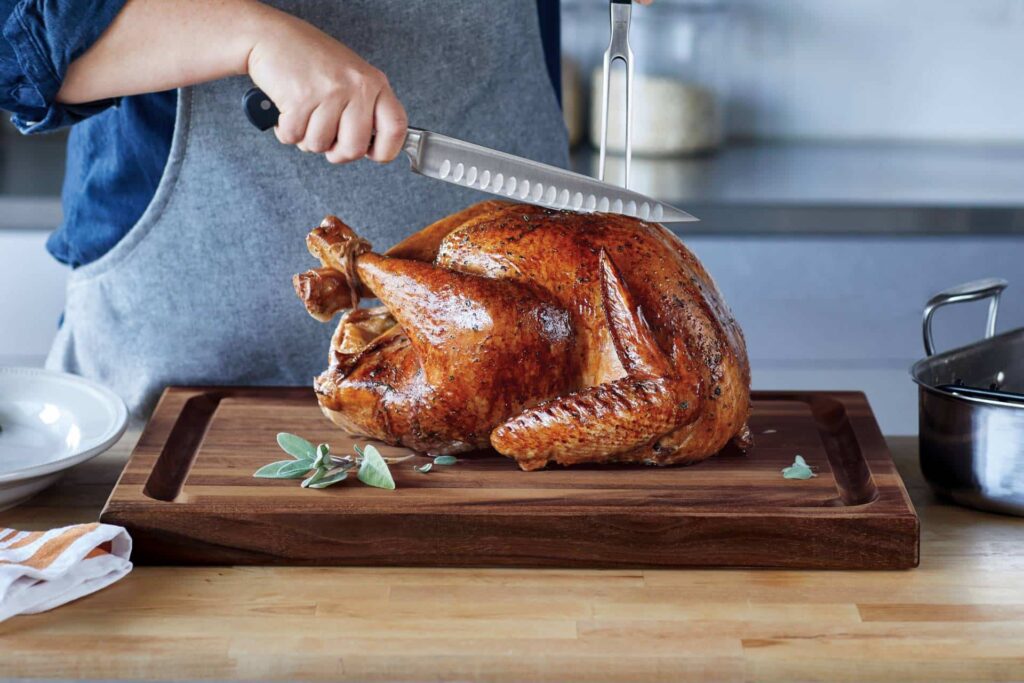
Remove the Legs and Thighs First
Start with the legs because they’re the easiest parts to remove. This builds your confidence before tackling the breast.
Pull the leg away from the body gently. You’ll see where the skin connects the leg to the breast.
Slice through this skin with your knife. Cut down until you reach the joint connecting the thigh to the body.
Use your hands to pull the leg backward firmly. You should hear or feel a pop as the joint dislocates.
Cut through the exposed joint with your knife. Angle the blade along the body to maximize meat removal.
Remove both legs using the same technique. Set them aside on your cutting board for later separation.
Separate Drumsticks from Thighs
Place the leg skin-side down on your board. You’ll see a natural fat line indicating where the joint connects.
Cut through this line with your knife. You may need to wiggle the blade slightly to find the joint’s sweet spot.
The drumstick and thigh should separate cleanly. If you hit bone, adjust your angle until you slide through the cartilage.
Remove the Wings
Pull the wing away from the body. Cut through the skin connecting the wing to the breast.
Locate the wing joint where it meets the body. This joint sits near the front of the turkey, below the neck area.
Cut through the joint to remove the wing completely. You can serve wings whole or cut them into two pieces at the elbow joint.
Repeat the process for the second wing. Set both wings aside or place them directly on the serving platter.
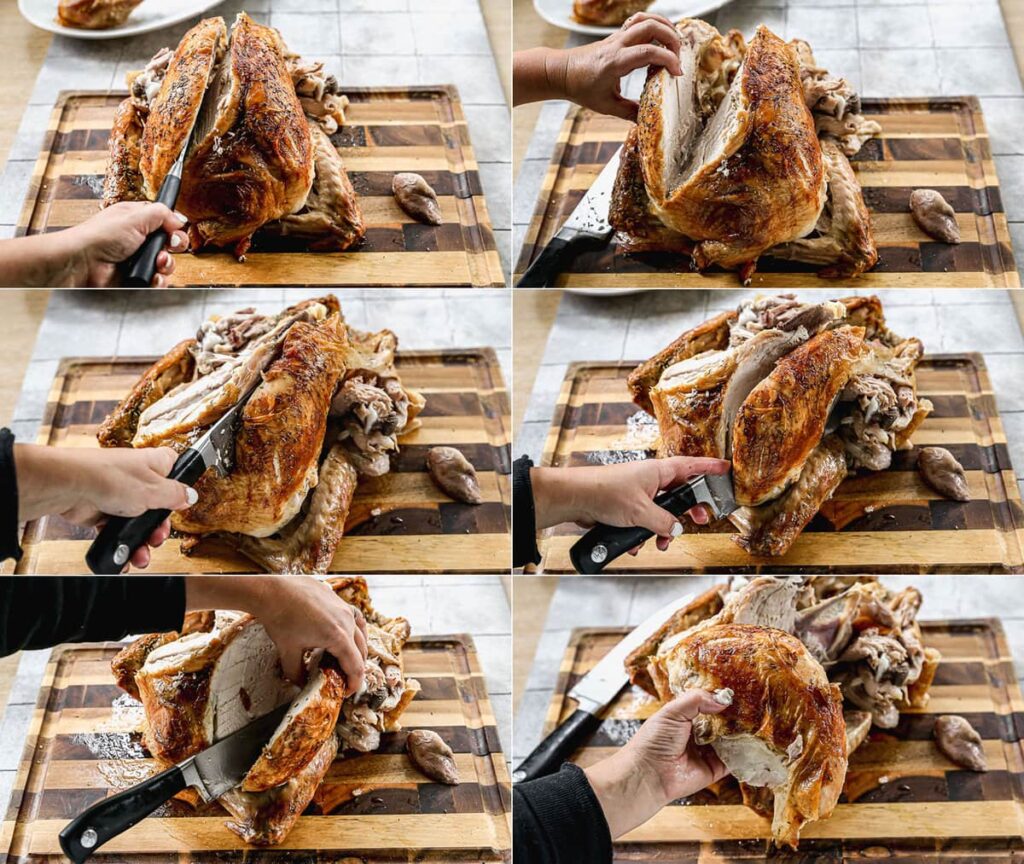
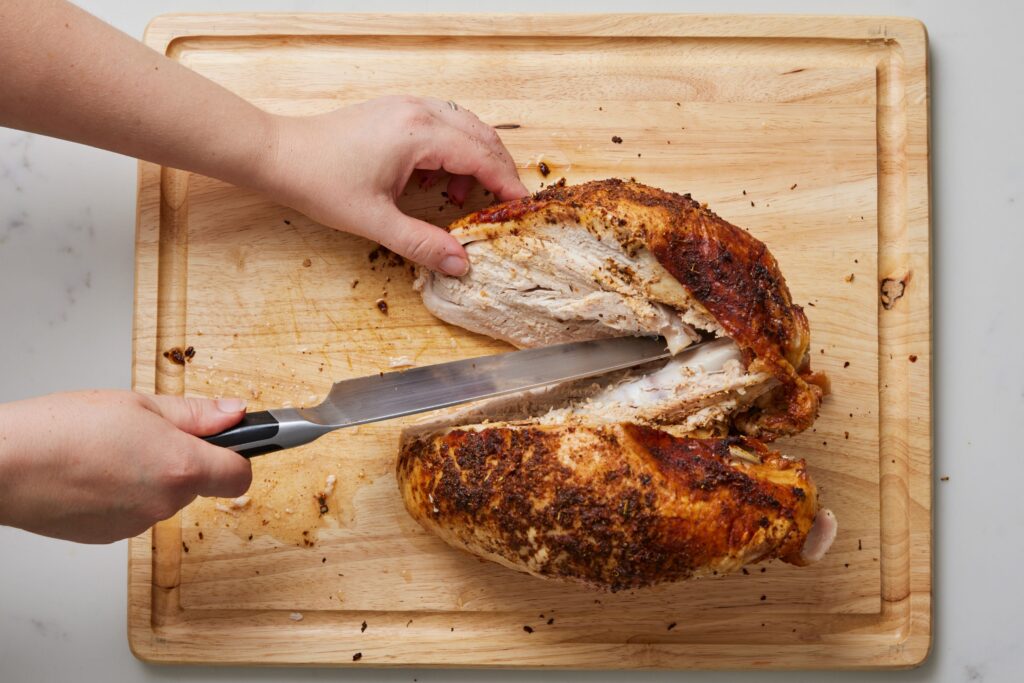
Remove the Breast Meat
This is the most important step for impressive presentation. Take your time and use smooth, confident strokes.
Locate the breastbone (keel bone) running down the center. This raised ridge separates the two breast halves.
Make a long cut along one side of the breastbone. Angle your knife slightly toward the bone as you cut.
Use long, smooth strokes to separate the breast from the ribcage. Let the knife follow the natural curve of the bones.
Continue cutting downward and outward. Pull the breast meat gently away from the body as you slice.
When you reach the bottom, make a horizontal cut to free the entire breast. The whole piece should come away in one beautiful lobe.
Repeat the process on the other side. You now have two complete breast halves ready for slicing.
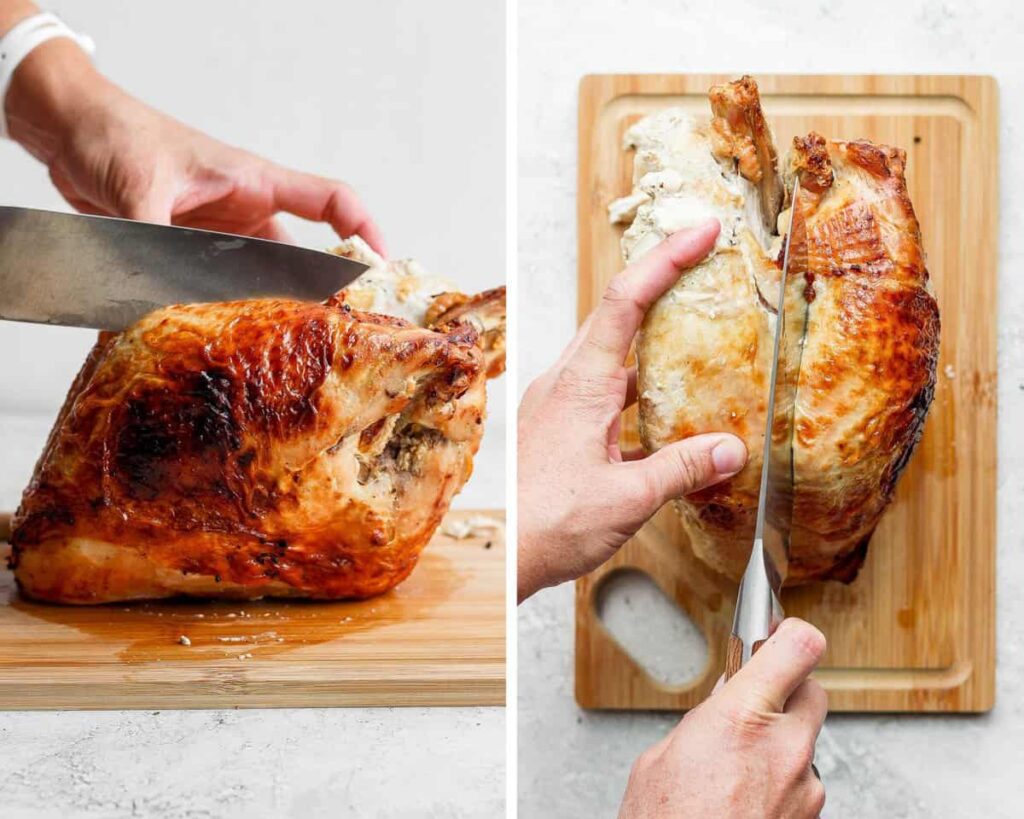
Slice the Breast Meat
Place the breast half skin-side up on your cutting board. Look closely to identify which direction the muscle fibers run.
Slice against the grain for maximum tenderness. This means cutting perpendicular to the direction the fibers point.
Cut slices about 1/4 to 1/2 inch thick. Use smooth, even strokes without sawing back and forth.
Keep the crispy skin attached to each slice. A sharp knife makes clean cuts that preserve the skin-to-meat connection.
Transfer slices to the platter immediately. Arrange them in an overlapping pattern for visual appeal.
Carve the Thigh Meat
Place the thigh skin-side up on your board. You’ll see a bone running through the center.
Slice along both sides of the thigh bone. Angle your knife to preserve as much meat as possible.
Remove the bone carefully once the meat is freed. You can save bones for making stock later.
Slice the boneless thigh meat against the grain. Dark meat is more forgiving than white meat, so don’t stress perfection here.
Thigh slices can be slightly thicker than breast slices. About 1/2 inch thickness works well for dark meat.
Don’t Forget the Oysters
Two small, tender medallions of meat hide on the turkey’s back. These are called oysters, and they’re incredibly flavorful.
Look for them in the hollow areas near where the thighs attached. They’re about the size of a large walnut.
Use your knife tip to carefully separate them from the bone. Many carvers reserve these choice pieces for themselves as a cook’s reward.
Professional Carving Tips and Techniques
Cutting Against the Grain
Understanding grain direction transforms good carving into excellent carving. The grain refers to the direction muscle fibers run.
Look at your meat closely before slicing. You’ll see lines running in one consistent direction across the surface.
Always cut perpendicular to these lines. This shortens the muscle fibers, creating tender bites instead of chewy ones.
Breast meat grain runs lengthwise from neck to tail. Slice crosswise across the breast for perfect texture.
Thigh meat grain typically runs at an angle. Adjust your cutting angle to maintain that perpendicular relationship.
Preserving the Skin
That golden, crispy skin is everyone’s favorite part. Protecting it during carving makes every slice more appealing.
A sharp knife is essential for clean skin cuts. Dull blades tear and separate skin from meat underneath.
Some carvers use kitchen shears for skin near joints. Scissors can provide more control in tricky areas.
Keep each slice’s skin attached to its meat portion. This ensures everyone gets that perfect crispy-to-juicy ratio.
Maintaining Slice Uniformity
Consistent slice thickness looks professional and ensures even portions. It also shows respect for your guests.
Use your knife as a measuring guide. Place your knuckles against the previous slice to gauge the next cut’s thickness.
Keep your slicing rhythm steady and smooth. Rushing leads to uneven pieces and torn meat.
If you make an odd-shaped slice, don’t worry. Place it on the platter where garnishes will cover imperfections.
Working Efficiently
Speed matters because carved turkey cools rapidly. Set up everything before making your first cut.
Work on one side of the turkey completely before rotating. This minimizes repositioning and keeps your workflow smooth.
Transfer pieces to the platter as you go. Don’t let carved meat pile up on your cutting board.
Cover the platter with foil between additions. This retains heat and keeps early-carved pieces from drying out.
Common Turkey Carving Mistakes to Avoid
Carving Too Soon
This is the number one mistake home cooks make. Impatience costs you juice and tenderness.
If you cut into a turkey fresh from the oven, juices flood out. Those juices should be inside the meat, not pooling on your board.
The meat also firms up during resting. Firmer meat is easier to slice cleanly without tearing.
Plan your timing to include proper resting. Your turkey will be better for the wait.
Using a Dull Knife
A dull knife makes carving frustrating and dangerous. You need excessive force, increasing injury risk.
Dull blades compress and tear meat instead of slicing it. This creates ragged edges and releases moisture.
Sharpen your knife the day before Thanksgiving. Don’t wait until the last minute to discover your knife is dull.
Test sharpness by slicing a tomato. A sharp knife should glide through the skin without crushing the fruit.
Sawing Instead of Slicing
Proper carving uses smooth, confident strokes. Sawing back and forth shreds the meat fibers.
Draw your knife through the meat in one fluid motion. Let the blade’s sharpness do the work.
If you find yourself sawing, your knife is too dull. Stop and sharpen it before continuing.
Removing Meat in Random Pieces
Systematic carving yields maximum meat with minimal waste. Random hacking leaves usable meat on the carcass.
Follow the anatomical structure of the bird. Remove legs first, then wings, finally breast.
This logical progression makes each subsequent cut easier. You’ll get more meat off the bone with less effort.
Forgetting About Temperature
Carved turkey cools much faster than a whole bird. The increased surface area accelerates heat loss.
Have all side dishes ready before carving. You want to serve immediately after plating.
Keep the platter covered until serving time. Even a few minutes of exposure significantly drops temperature.
Consider warming your platter in a low oven beforehand. A warm platter helps maintain turkey temperature longer.
Plating and Presentation Tips
Arrange for Visual Appeal
Start with your best-looking pieces in the center. The perfectly sliced breast meat should take prime position.
Create height variation on the platter. Don’t just lay everything flat in a single layer.
Tuck drumsticks at angles for dramatic effect. Their classic shape adds visual interest to the arrangement.
Overlap breast slices slightly like fallen dominoes. This technique maximizes space and looks professional.
Position darker meat around the perimeter. Thigh slices and wings frame the lighter breast meat beautifully.
Add Garnishes
Fresh herbs bring color and aroma to your platter. Sage, thyme, and rosemary complement turkey perfectly.
Tuck herb sprigs between meat sections. They fill gaps and add elegant greenery.
Citrus slices provide bright pops of color. Lemon, orange, or even cranberry pieces work beautifully.
Fresh cranberries scattered around the edges add festive color. They hint at the cranberry sauce waiting nearby.
Small apples or pears make sophisticated garnishes. Cut them into wedges and arrange artfully around the meat.
Timing Your Presentation
Carve as close to serving time as possible. Every minute that passes means cooler turkey.
If you must carve early, keep the platter in a warm oven. Set it to the lowest temperature (around 170°F) to hold without cooking further.
Prepare a backup heating plan for second helpings. You might need to microwave portions later for guests who want more.
What to Do With the Carcass
Save It for Stock
The turkey carcass contains tremendous flavor. Don’t throw it away after carving.
Break the carcass into manageable pieces. Place them in a large pot or slow cooker.
Add vegetables like onions, carrots, and celery. Throw in herbs and peppercorns for extra flavor.
Cover with water and simmer for several hours. You’ll have rich, homemade turkey stock for soups and gravy.
Freeze for Later
If you’re not ready to make stock immediately, freeze the carcass. Wrap it well in plastic wrap and aluminum foil.
Frozen turkey bones keep for up to three months. Mark the package with the date so you remember when you stored it.
When you’re ready, thaw overnight in the refrigerator. Then proceed with stock-making as usual.
Special Considerations for Different Cooking Methods
Smoked Turkey
Smoked turkeys often have darker, firmer skin. The smoking process creates a different texture than oven roasting.
Use the same carving technique, but be extra careful with the skin. Smoked skin can be more delicate despite its appearance.
The meat might be slightly drier than roasted turkey. Slice slightly thicker to compensate for reduced moisture.
Spatchcocked Turkey
A spatchcocked turkey lies flat, with the backbone removed. Carving follows similar principles but with easier access.
The breast meat is already more accessible. You can slice it directly off the bird without removing the entire lobe.
Leg removal is simpler because the joints are more exposed. Pull and cut with less searching for connection points.
Deep-Fried Turkey
Deep-fried turkeys have incredibly crispy skin. Exercise extra care to keep this delicate coating intact.
Let fried turkeys rest slightly longer than roasted ones. The extreme heat needs more time to equalize.
Support the breast carefully when removing it. The crispy exterior can crack if handled roughly.
Troubleshooting Carving Problems

The Joint Won’t Separate
If you can’t find the joint, don’t force it. You’ll bruise the meat and make the problem worse.
Wiggle your knife gently while applying light pressure. You’ll feel when you slip into the cartilage gap.
Try pulling the limb in different directions. Sometimes a different angle exposes the joint more clearly.
Use kitchen shears as a last resort. Cut through the connective tissue if the joint absolutely won’t budge.
The Breast Won’t Come Off Cleanly
You might be cutting at the wrong angle. Try following the ribcage contour more closely.
Make sure you’ve located the actual breastbone. Sometimes what feels like the center is actually slightly off.
Use longer strokes with less pressure. Let the knife glide rather than forcing it through.
Slices Are Falling Apart
This usually indicates cutting with the grain instead of against it. Rotate your cutting angle 90 degrees.
Your knife might also be dull. Sharpen it before continuing with the remaining breast.
The turkey might be overcooked and dried out. Add moisture by drizzling with hot broth or pan drippings.
Everything Is Getting Cold
Work faster by eliminating unnecessary movements. Have your platter right next to your cutting board.
Recruit a helper to transfer pieces while you carve. This teamwork approach keeps things moving efficiently.
Preheat your serving platter in a warm oven. Start with a hot surface to offset cooling.
Carving for Different Group Sizes
Small Gatherings (4-6 People)
For small groups, you might not need to carve the entire turkey. Remove what you’ll serve immediately and refrigerate the rest intact.
Focus on one breast half and one leg. This provides both white and dark meat options without excessive carving.
Reserve the second breast half for sandwiches later. Intact meat stays moister in refrigerator storage.
Medium Gatherings (8-12 People)
Carve the full turkey but adjust slice thickness based on guest count. Slightly thinner slices stretch the meat further.
Calculate roughly 1 pound of turkey per person. This accounts for both white and dark meat preferences.
Arrange the platter strategically to make portions obvious. Don’t let early guests take disproportionate amounts.
Large Gatherings (12+ People)
Consider carving in the kitchen rather than tableside. This speeds the process and reduces performance pressure.
Enlist help from a family member. One person can carve while another plates and garnishes.
Prepare serving utensils on the platter. Make it easy for guests to serve themselves without destroying your arrangement.
Safety Tips for Turkey Carving
Knife Safety Basics
Always cut away from your body. Never pull a knife toward yourself under any circumstances.
Keep your free hand positioned opposite the cutting direction. Your fingers should stay well clear of the blade’s path.
Never try to catch a falling knife. Step back and let it fall safely.
Handling Hot Turkey
Use paper towels or a clean kitchen towel for grip. Bare hands on hot turkey can cause burns.
Let the turkey cool enough to handle safely. If you can’t comfortably touch it, give it more resting time.
Be cautious of steam when removing foil covers. Hot steam can burn exposed skin quickly.
Preventing Slips
Keep your cutting board dry and stable. Wipe up spills immediately to prevent knife slippage.
Don’t overfill the cutting board with meat. Clear carved pieces to the platter regularly.
Work in good lighting conditions. Poor visibility increases accident risk significantly.
Advanced Carving Techniques
Restaurant-Style Presentation
Professional chefs often remove the entire breast, then slice it on a bias. This creates longer, more elegant slices.
Fan the slices slightly when plating. This restaurant technique makes portions look more generous.
Reserve the most perfect slices for the center of the platter. Use less perfect pieces around the edges where garnishes will help.
Maximizing Meat Yield
Scrape the carcass carefully after removing major pieces. Small bits of meat hide in crevices and around joints.
Use a spoon to scoop meat from hard-to-reach areas. The small indentations along the backbone hide tasty morsels.
Don’t forget neck meat if your turkey included the neck. It’s surprisingly flavorful when properly extracted.
Creating Uniform Portions
Pre-portion the platter into serving sections mentally. Divide the space by your guest count.
Aim for similar amounts of meat in each section. Mix white and dark meat evenly across the platter.
This technique ensures fair distribution and prevents awkward “who gets what” moments.
Storing Leftover Turkey
Proper Refrigeration
Remove all meat from the carcass within two hours of carving. Bacteria multiply rapidly at room temperature.
Store white and dark meat separately if possible. They have slightly different storage considerations.
Use airtight containers or heavy-duty zip-top bags. Minimize air exposure to prevent drying and oxidation.
Properly stored turkey lasts 3-4 days in the refrigerator. Date your containers so you know when to use them.
Freezing Carved Turkey
Freeze turkey in portion-sized packages for easy use later. Small packages thaw faster than large ones.
Remove as much air as possible before sealing. Air exposure causes freezer burn and flavor loss.
Frozen turkey maintains quality for 2-3 months. Beyond that, it’s still safe but quality declines.
Label packages clearly with contents and date. Future you will appreciate knowing exactly what’s inside.
Reheating Without Drying
Add a splash of broth when reheating turkey. The extra moisture prevents the meat from drying out.
Cover containers during microwave reheating. Trapped steam helps keep the meat tender.
Reheat gently at lower temperatures. High heat toughens the protein and squeezes out remaining moisture.
Frequently Asked Questions
What is the best knife to use for carving turkey?
A straight-edge slicing knife between 8-12 inches long works best for carving turkey. The long blade allows smooth, single-stroke cuts through large breast sections without sawing. Choose high-carbon stainless steel that holds a sharp edge.
How long should turkey rest before carving?
Let your turkey rest for 20-30 minutes before carving, depending on its size. Larger birds over 15 pounds benefit from 30-45 minutes of resting time. This allows juices to redistribute throughout the meat for maximum moisture and makes carving easier.
Should I carve turkey at the table or in the kitchen?
Carving in the kitchen is more practical and efficient than carving at the table. You’ll have better control, proper lighting, and all your tools within reach. Plus, you can fix mistakes privately and present only the beautiful finished platter.
What does it mean to cut against the grain?
Cutting against the grain means slicing perpendicular to the direction of the muscle fibers. Look at the meat and identify which way the fibers run, then cut across those lines. This shortens the fibers and creates tender bites.
How do I keep the crispy skin attached to each slice?
Use a very sharp knife to make clean cuts through the skin without tearing. Some carvers prefer kitchen shears for particularly crispy skin areas. Take your time and use gentle pressure rather than forcing the knife through.
Can I carve the turkey ahead of time?
Yes, you can carve turkey up to 2 hours before serving if you keep it covered and warm. Place the platter in a 170°F oven or cover tightly with foil. However, turkey is juiciest when carved just before serving.
What should I do with the turkey carcass after carving?
Save the carcass to make homemade turkey stock. Place it in a large pot with vegetables, herbs, and water, then simmer for several hours. Alternatively, freeze the carcass for up to 3 months for stock-making later.
How thick should I slice the turkey breast?
Slice breast meat about 1/4 to 1/2 inch thick for best results. Thinner slices create more elegant presentations, while slightly thicker slices are more forgiving if the turkey is a bit dry. Maintain consistent thickness throughout.
Why is my carved turkey always dry?
Your turkey might be dry because you’re carving too soon after cooking, before juices redistribute. Other causes include overcooking the bird initially or using a dull knife that squeezes out moisture. Always rest the turkey 20-30 minutes and use a sharp blade.
How do I find the joints when removing legs and wings?
Pull the leg or wing away from the body to expose where it connects. Cut through the skin first, then wiggle your knife gently while applying light pressure. You’ll feel when you slip into the cartilage gap at the joint.
Conclusion
Mastering the best way to carve a turkey transforms your holiday hosting from stressful to impressive. The key elements are proper preparation, sharp tools, systematic technique, and patience.
Start by letting your turkey rest adequately, then remove legs and wings before tackling the breast meat. Always cut against the grain with smooth, confident strokes using a sharp knife. Remember that practice makes perfect—each turkey you carve builds your skills and confidence.
Don’t stress if your first attempts aren’t flawless; even imperfect carving tastes delicious when the turkey is properly cooked. Set up your workspace efficiently, work methodically through each step, and transfer carved meat immediately to a warm platter.